"...In the dance of sun and water and sky. In the faces of the people who need us most and of the people we most need. In the smell of breakfast cooking on a charcoal fire. Who knows where we will find Him or whether we will recognize Him if we do? Who knows anything even approaching the truth of who He really was? But my prayer is that we will all of us find Him somewhere, somehow, and that He will give us something of his life to fill our emptiness, something of his light to drive back our dark"
-The Great Dance -Frederick Buechner

Tuesday, November 6, 2012

Whoopsie... forgot about the blog for awhile:)

My blog-less summer/fall hasn't meant we haven't been doing anything around here.

Theme song for the summer was "The green grass grew all around."  We seeded a whole lot of grass and thankfully it actually all came in... super thick and green and awesome.  We were stoked.  I don't have a pic but you can imagine.  We had to mow that sucker like 10 times this summer (that might be a slight exaggeration but we mowed it lots)

I am always more of a fan of inside projects even though the fact that we got lots of trim and fascia done on the outside of the house is awesome:)

Nels kicked the summer inside projects off by doing our kitchen back splash for me for my birthday.  This is not the greatest pic but you can imagine that it looks super awesome.  White subway tile with dark grout=love.  Unfortunately our computer crashed and all our pics are totally mixed up so I can't find a decent pic anywhere:(


We scored this older dresser from Nels' parents and I was super excited to paint it my new fave colour "Wythe Blue" from Benjamin Moore.  After pinning many pics of painted dressers on pinterest I finally got around to doing it!

Here's the before 

And the after shot.  Unfortunately I have the two bottom drawers in the wrong spot for the after so the little design is mixed up but you get the idea.  Currently the dresser is in our kitchen just under the calendar.  I'm all for using bedroom furniture all over the house these days.  So useful for storing things:)


 Molly hasn't been a fan of her crib for quite some time now so we were tossing a few ideas around for a toddler bed for her.  We wanted it to be a single bed size so we could still snuggle and also so that she could grow into it.  We had a single mattress laying around along with some spare wood from goodness knows what so Nels got to work one day and came up with this bad boy:


After we had the construction down we actually took it apart and I stained everything and painted a blue (Whythe blue, that is) heart on the headboard.  WE ABSOLUTELY LOVE THIS BED.  It looks super cute in Molly's room and we're slightly proud that we made it for her!


Last but not least... Nels was looking for some scrap pieces of furniture for a different project at our local Habitat store and came across this awesome piece... he took a pic and sent it to me.  I LOVED it.  Even more I loved the 50.00 price tag.  Its super solid wood and just needed a few repairs with carpenters glue.


We moved it into the entryway and I am really happy with it.  Now I might need to do something with the blackness of that mirror but other than that I'm loving the new addition.


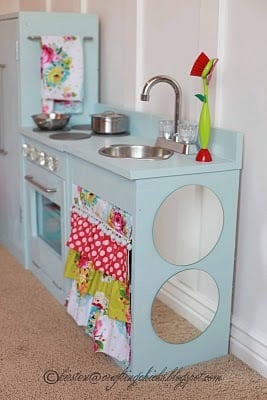
Next up we are SUPER excited to build a play kitchen for Molly for the play room.  We've found a few things on pinterest that we're going to be taking ideas from and maybe I'll even be on the ball enough to get some pics of the building process.  
There is a great tutorial for a play kitchen here that Nels has been looking at and tweaking a few things to fit the space we have
This pic makes me super excited for the kitchen and I'm excited to add all the finishes to it.  Molly will soon have some of her very own cupboard doors to open and close!


Wednesday, May 30, 2012

i joined the turquoise bandwagon

I think i've mentioned before that I've always been a little bit weary of blue.  Don't know why, but I always lean towards greens and yellows for my favourite decorating colours.

My appreciation for blue started when I painted our coffee table Benjamin Moore "Blue Nose" as i posted here.  Of course I've also noticed the huge turquoise trend in decorating right now so I had to have a part of this blue pie.  It also doesn't hurt that I love yellow and turquoise together so it naturally fits in a few places in the house.

I picked up a few bottles of spray paint from Home depot a few weeks ago.  I've been looking for the perfect yellow spray paint for awhile so after this post on Young House Love,  I was stoked to check it out.  Home depot has a REALLY good selection so along with the yellow I picked up a green and turquoise colour.

This mirror had been 3 different colours now but I think this turquoise is here to stay.    The actual colour is aqua in the Rustoleum brand.


These little buckets are plastic and they were 3.00 at superstore.  I LOVE all the turquoise and yellow at superstore right now.

Yah for turquoise!   I've done a few things with the green and yellow paint as well that I'll post about later.

Friday, May 25, 2012

And I thought I was the crafty one...

Is it too late to post about mothers day??  I don't think so, so here it goes.

First off, most people know that one of my recent passions is a good DIY project.  Painting, gluing, sewing etc... there is something so authentic about things in your house that you make yourself.

Along with my DIY project passion comes my passion to spend less.  Spending less for me has included re purposing furniture, getting cheap art, as well as sticking to a strict budget for groceries and miscellaneous spending.  Consuming less in general has made my life so much easier and less stressful (especially when it comes to personal spending).  It really is so much easier to get dressed when you only have a few outfits you really love:)

Ok so anyway, this brings me to the AWESOME AWESOME AWESOME gift Nelson made me for mothers day.

I love this gift because

  1.  He came up with the idea himself (he is the more creative one out of the two of us even though it hurts to say it)
  2. This was made out of recycled barn board from the farm
  3. Pretty sure he spent less than $5.00 on this project
  4. He was man enough to finish it at the fire hall and I'm fairly sure the guys made fun of him for doing a craft for mothers day.
  5.  It is something that is unique and I will cherish forever

Alrighty folks, here it is!

thanks to Mike for taking the pics via Instagram.  The project in the pics below is actually a frame the guys made for Ali after Nels had already given mine to me but you get the gist of what he did for mine.

Here's the barn board ready to get cut down


The first piece for the frame

screwing the wire on the boards


The nearly finished project

Ta da... hère is the one Nels gave me... the pics of Molly are so dang cute.   They're hanging on some clothespins with scrapbook paper glued on.

love it...


Thursday, May 10, 2012

Upstairs Tour

So the great part about announcing that you're going to do spring cleaning is that everyone asks you how it went so you have no choice but to actually do it.

Thanks so much to Mom and Seonhee for taking Molly so I could finally do a bit of cleaning upstairs.  Seeing as how in my mind it is now officially Spring (we've gone long enough without snow I figure that  makes it official) I figured I'd do an upstairs tour on what we accomplished in the 2011/2012 winter.

(I might warn you that we didn't spend a whole lot of energy decorating/finishing the upstairs because about 90% of our time is spent on the main level of our house right now)

Starting off in the guest bedroom:

We did not get the trim done up here and I'm not even thinking we're going to tackle that in the Spring/Summer.   Trim seems like more of a winter thing to me and since we have SO MUCH trim and Nels did an awesome job at getting it almost all finished on the main level I think I might back off on that one for awhile.

We did a curtain switcheroo and these blue curtains that were in Molly's room to begin with got moved here.  They're pretty heavy curtains so they block out a decent amount of light for those early mornings.  We moved them from Molly's room because we found they didn't block quite enough light for her so we needed some roller blinds along with curtains.   Now Molly has the roller blinds and some white curtains instead of the blue.


I have found one of the best things about finishing the house slowly is that I can take my time developing each room into what I want.  I picked up this bedspread before Christmas (on a major sale at Winners) and I really wanted to use it for the colour scheme in the guest room.  I haven't really done anything with it since then but the blue curtains are a start and we added a few white frames with scrapbooking paper in them (cheapest art EVER) and it all fits in fairly well.  Eventually I'd like to do something with lace like maybe some hanging lanterns that have been floating around pinterest for awhile now


This is by far one of my most favourite pieces of furniture in the house.  Its an old dresser from my mom that I had painted red back in college and then a few summers ago I sanded it off for a bit more of a distressed look.  I have it in the guest room right now but it might get a change to the playroom in the future.


I am in the process of spray painting a mirror for the guest room so maybe I'll give an update in a few days with the actual finished room but thats it for now.

Upstairs Bathroom

The upstairs bathroom got a colour change this winter.  The colour is "Rust" by Benjamin Moore (old colour was Benjamin Moore Huntington beige).  I really like it but the bathroom still needs a lot of work


Here are the tiles we want for the top of the counter (the same ones we'll be putting in for the kitchen backsplashl).  I want to use a dark brown grout for them which along with trim and baseboards will finish the bathroom off really well.


Here you can see the trimless, curtainless window.... needs some TLC obviously but I have plans for it along with the open closet that is to the right of the window (the closet is currently just a doorless, empty space as are most of our closets upstairs).


Moving on to Molly's room:

 I think this is the only room in the house that is actually looking WORSE than when we first decorated it.  Why the single bed you might ask???  Well we're currently storing that bed and since Molly's crib is in our room until some of her night wakings come to an end we thought we'd store the single bed in her room.  My thinking is that when we move her crib upstairs I might sleep in the single bed if nights are still really bad and I'm hoping by the end of the summer that single bed will be in the basement and our little girl will be having some great sleeps on her own:)  Yup, thats right, our once AMAZING little sleeper has turned over a new leaf and cannot sleep for more than 4 hours for the life of her...


I would LOVE to re-finish that rocking chair as well.  That too is a temporary piece of furniture because the rocking chair that we LOVE and use all the time is in our room as well.


 Here is a very unflattering picture of one of the windows in Molly's room.  no trim and the curtains are in need of a good hemming but those blinds are AWESOME at making this room super dark


We did recently get the closet doors put up in Molly's room thanks to Kurt and Steve and Nels but here's a look at the inside of her close.  It is pretty much my full time job keeping track of her clothes and constantly sorting and storing clothes that are too big or small... I'm not a fan of that process


 a few more shots of Mols room... this picture collage is only ok.  I put it up after I took the 2 white frames out of here to put in the guest bedroom.


one of her floating shelves... can't wait to work on this room and actually have her sleep in it and maybe do something fun with paint for the walls


Ok, last but not least the bonus room:

Here are the curtains I made out of that shower curtain.  They serve a great purpose in covering up the holes to our "tunnel" and hiding whatever mess might be in there


Here's a shot of the 2 of them and the window seat.  I need to work in this room to make that window seat more fun.  Not sure what I'll do yet but probably some sort of stencil on the walls and some cushions for the seat


right now we've got some basil growing up on the window and we're pretty proud of our first attempt at herbs.  This area gets lots of sun so things grow really well up here


Here's the other side of the room.  I want to paint that black toy box a fun bright colour and move one of the couches downstairs to make room for some more toys and storage.


I think stripes are in the near future for this space after I saw the picture below on pinterest.  I think this would be a really simple way to make this space more interesting along with some kid friendly art.


So thats the upstairs for you.  Like I said, we haven't done a whole lot of work up there this year due to our focus on the main floor but I think there's lots of potential and I look forward to tracking our progress up there.


Monday, May 7, 2012

What can I get for $500.00??

In my mind 500.00 is a lot of money especially to spend on something for the house so with our budget we set out to get curtains for the living room, baby room (we needed some blackout blinds) guest bedroom and maybe our bathroom if we found a super super deal.

We set out first to Home depot where we found all the hardware we needed for the extra long window in the living room as well as the blackout roller blinds for Molly's room.  While we were there I decided "to heck with it, I'm just gonna get all the curtains here to."  In the back of my head I remembered how cheap and awesome the curtains were at Ikea but I didn't want to have to make another trip into the city so right there and then we bought enough Martha Stewart Daydream Sheer curtains to fit our living room (4 panels total).  These puppies were $30.00 a pop so that's 120.00 total.  More than I wanted to spend but still within the budget so I felt ok.  We also decided on Habitat Swiss Dot Panels for Molly's room because I wanted something white and the polka dots seemed fun.  We needed 5 panels for her room (holy windows!) so at about 25.00 each this was about 125.00.   YIKES what was I thinking and why are curtains this much!?!?  We also picked up the blackout blinds for Molly's room so that pushed us up to about 500.00 exactly including all the hardware.

Needless to say, we got everything home Nels installed the blackout blinds and they had been measured inaccurately at the store (super annoying) we put up the living room curtains and we were less than in love with them too.  I HATE it when this happens but i kind of obsessed a bit and decided that nope, they weren't for me.

I didn't mind the pattern... thought it was kinda cool but the curtains were more of a cream than the white I was looking for and they just didn't seem right for a living room.  We both thought they looked more bedroomish so they had to go


I will spare some of the more boring details but we ended up taking ALL THE CURTAINS back.  The ones for Molly's room were way too sheer and just horrible looking.

We ended up making a trip to Ikea and picked these curtains up for 40.00 TOTAL!!  So we ended up saving 80.00 on the living room and these were the curtains I had originally wanted anyway.  Here's a little preview of what they looked like.  I had to hem and cut and iron and do all that fun stuff but they're finally up and I'll try to get some pics tomorrow.   We picked up some plain white curtains in a thicker fabric for Molly's room and I'm happy with them too but the hemming process is dragging out a bit longer on those.  It doesn't really help that the same Ikea curtains are often very different lengths and not exactly even so there is a lot of hanging and pinning and remeasuring happening and I am not loving that part of this whole thing :(


The happiest moment so far in the curtain saga is that we had enough money leftover to get this little table that we put under our floating shelves in the kitchen.  I'm working on making the kitchen a bit of a functional play area for Molly so this shelf is really helping.  I'm looking forward to filling it up and arranging things a bit better but we're pretty happy with it and Nels picked out so I can't even blame myself for spending money on it:)


I love how it fills the void space under those shelves!


So in the end I guess 500.00 did go pretty far.  We got the guest room taken care of because we moved Molly's current curtains in there to make way for the blinds and new curtains.  We also had one panel leftover from Molly's bedroom (the curtains we bought came in a set of 2 for 30.00 and we needed 5 so the 6th one will go in the bathroom upstairs). We bought hardware and curtains for the living room and we got the table.  
As it turns out we also scored some free hand- me- down curtains from a friend and I'm hoping to do some fabric painting on them similar to what was done to these chairs here.  The hand-me-downs will probably be going in the playroom and our bathroom (we got 4 panels in total)

So there you have it, that's what 500.00 will get for ya.  I look forward to the day when all the hemming and hanging is done so I can have a true before and after pic:)  I am told I am a little too obsessive about the length and the way curtains "hang" so this process is taking WAY too long.

In other news SPRING CLEANING is happening tomorrow!  Spring cleaning sounds so good in theory but I've found it super hard to do with Molly wanting to play all day.  The great news is Mom and Seonhee are hangin with Molly for a few hours tomorrow so I can get a few things done.  I'm so excited and grateful!!  


Monday, April 16, 2012

The shower curtain that became many things

So part of my spring cleaning involves cleaning out our very scary-messy office.  Yesterday I finally had the chance to get rid of the shower curtain I've had hanging on the ironing board for MONTHS.

Basically, I love this shower curtain.  The colours are awesome and I bought it to make curtains for our little crawl space in the play room.  I can't believe the cost of fabric... especially any fabric I actually like so when i found this Amy Butler curtain on sale at Bed Bath and Beyond for 12.99 i was super excited.

So the first thing I wanted to do was to make the curtains.  I folded the fabric in half lengthwise and gave it a good iron

I pinned the edges so my cutting would be as accurate as possible


I laid the material out on the table and ironed it again.  


so after I cut the fabric in half lengthwise I measured the length of the opening to our playroom tunnel and then cut the material again to match 


to make a long story short I used a leftover iron on hem from some curtains I bought at ikea (iron on hems are AWESOME by the way) so I did this whole project with no sewing!!!  Embarrassing right... especially coming from a home economics teacher.  We still need to get some curtain rods so there's no pic of the finished product but the curtains are laying in the playroom waiting to be hung.  

I had a bunch of leftover fabric which I was happy about because I saw this post on Young House Love for making a bulletin board and I had all the materials... AWESOME

I bought these brown cork boards awhile ago (from Michaels) and I had ribbon around them to jazz them up but i didn't love them and they really did not stay on the wall with the little sticky things they give you to hang them.


So i took off all the ribbon and lined 'em up


I read over the young house love tutorial and tried my hardest to do the same thing


I duct taped them all together and then duct taped the fabric on


I found there was some problems where the fabric overlapped so I had some of this Sew No More glue to glue the fabric down so it didn't stick out so much


As always, I had a plan B just in case this project didn't work out (its the teacher coming out of me... ALWAYS have a plan B).  Even though it probably would have been ok I didn't really know how I was going to get this thing on the wall and duct taping the 4 cork pieces just didn't make them sturdy enough.  Thankfully I had some of this hard board (not sure if that is the technical name) from home depot laying around the office so I went about gluing the fabric and cork on the board


Here are all my gluing methods I was about to try but thankfully the first one worked like a charm (Elmers wood glue).  I put some pots and pans onto of the bulletin board to get the glue to set and in an hour the magic happened... it stuck together!


I screwed these hooks onto the board that you get in one of those picture hanging kits


I threw some wire through the screws (like what you do when you hang most ikea frames) and ta da... finished!


Here's the board with its shelf friends in the office


and here's what it looks like with a few things on it... even though I think the online pinboard idea that pinterest provides is amazing... I will always love a real life bulletin board with real life pictures.


All in all this was awesome because:

a) I was able to do all of this while Molly was napping
b) I killed 3 birds with one stone.  I de-cluttered the office by using the fabric and hardboard plus I got my curtains hemmed and a bulletin board out of the deal
c) this cost me $0.00 because I had all the supplies:)